
Self Portraits Art Lessons
Self Portrait Lesson Plans - Elementary 2nd - 6th
Menu
Submitted by: Tammy Morin, Lake Anne Elementary
Lesson: What do I Value? Values Self Portrait Painting


From Tammy:
One project that I have done for Power of Words theme is value self portraits. They created a painting using only black, white and values of gray. They mixed the colors themselves. I also took pictures of them, brought them into the computer and made them black and white so they would have an easier time seeing the values. When the painting was finished we talked about their personal values and what was important to them. They then created a list to use for the painting. We cut the paintings out and mounted them on black paper. They then painted their "values" around the portrait.
From Judy:
This lesson is good for elementary through middle school (and up). I particularly liked the range of styles of painting this project showed. I selected two very different examples from the ones Tammy shared. Examples above are from 6th graders.
Lesson: Clear Vinyl Window Portraits
 |

|
Photoshop portrait |
Clear vinyl window portrait |
Cathy Gaul did an all school project to celebrate their 50th anniversary. Her project was to also tie in Character Education. Her building has a long row of windows between buildings. She displayed clear vinyl student portraits on the windows. She manipulated the student photographs in Adobe Photoshop to get a good line drawing for the students to follow. The photographs were printed out 5" x 7 "(12.7 x 17.7 cm) with a one inch border all around. She cut the vinyl 7" x 9" (18 x 23 cm). A roll of 12 gauge clear vinyl had been donated to the school. Cathy finished up with clear shower curtains when the vinyl ran out. Students taped the vinyl to the print and did a line drawing in black permanent markers - then colored the portrait and border. The clear vinyl sticks to the window if you wet the window first - then roll on the portraits with a brayer. Be sure to put the marker side facing towards you (not against the window). She also put up drawings or party clip art and Character Education words in different fonts and colors.

Lesson: Glue Relief Self Portraits
Materials:
Regular White Glue


Procedures:
Students draw self portrait from observation using mirrors. Plan composition on newsprint paper then transfer to black Construction Paper
These make very expressive self portraits and are always a success.
 Submitted by: Chris Lincoln
Lesson: Pillow Portraits
From Chris:
4th graders first drew with pencil on muslin, then traced over with ultra thin Sharpies and finally colored with Watercolor Pencils
Wire stands were made with from light weight coat hangers. We untwisted them, cut them to a standard length - then wrapped them around a round form and twisted the remaining length a few times and bent the twisted ends upward and just popped the stuffed soft sculptures onto them.

Submitted by: Jan Hillmer
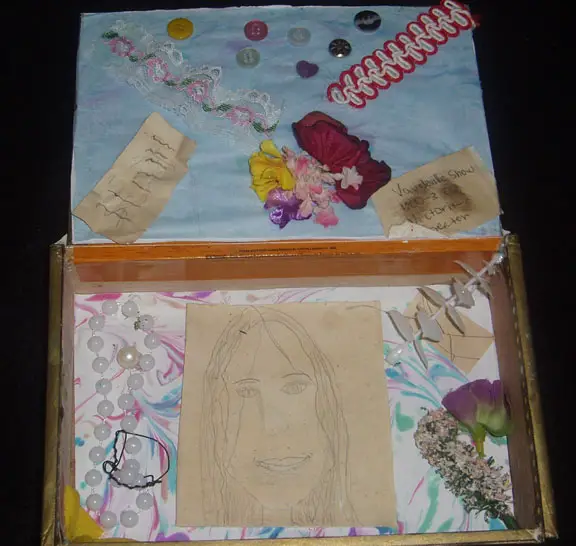
Lesson: Personal Identity Shadow Boxes (Memory boxes - See images above)
Jan was very luck and had enough wood cigar boxes donated to her school for this project. Those of you without that treasure resource can make your own boxes from in expensive lathe strips and luan board (1/4 inch thick plywood for flooring - cut to size). If you are on a tight budget, use the corrugated cardboard instructions below:
Teacher
prep: Cut corrugated cardboard to size with paper cutter (or Utility Knives
1. Finish collecting collage materials for shadow box. Your images should relate to the person you have selected. This is a narrative piece - that is, it should tell a story with pictures. Select for printing any digital images from your disks that you wish to use in the shadow box. Wallpaper may be used for background; Biography strips may be collaged onto sides of box. You will not need to find collage materials for the back of your box—that is where you will collage your writing.
2. Develop a rough plan on white paper (do not glue images to the paper). The inside should feature the portrait of the person you selected. Other images should relate to the accomplishments (may also show how discoveries, inventions, etc, are used today). Study some of the examples of Joseph Cornell’s work to see how he has created layered images.
PLAN SHEETS ARE DUE _________ FOR A GRADE. Be sure to list any additional collage materials that will be needed. Some of them I may have. You are responsible for bringing in anything that is not covered by art fees. See the lesson sheets for list of supplies that your fees will cover.
To make box: Cut out corners of cardboard along score lines. Fold sides of box up. Tape all around with wide masking tape. Paint inside of box - or collage paper inside (to hide cardboard - we used strips of black paper or strips of printed biography).
3. Begin to glue down background with Mod-Podge® Gloss Medium.

4. Roughly cut out images (you will cut neatly later). Apply images to cardboard in the same manner. Allow to dry—NEATLY cutout cardboard images. (we used scrap black and brown cardboard)
5. When glue has dried, brush gloss medium over entire surface. Use caution when brushing over computer images - ink will bleed.
6. Collage writing or related materials over outside edges of box. May frame with a selection of border designs.
7. Assemble images into box with hot Glue Gun
Alternate: Shadow box with fake "Daguerreotype" cover.
For this project, the door of the box is taped on before the collage. Tape front left side edge with wide tape -- and along the back side. Collage the back side of door to box. May use timeline of events or any appropriate images. The out side of the door has the fake daguerreotype. Photograph/portrait of Hero is printed on transparency. Cardboard spray painted silver is placed behind transparency. A frame is made from Tooling Foil
 These boxes include a self portrait drawn on tea stained paper. The identity depicted in these was to be a character in a play about New York City at the turn of the century (the drama teacher wrote the play). Students could use their shaving cream marbled paper if they wished. Many different materials were used for these boxes.... from image sources provided by Jan to objects brought in by students. Students did reflection writing for this project. (See Artists' Statement below)
Memory Box Artist's Statement
Your Memory Box
Artist’s Statement
Your heading should include your real name, your character’s name and your class code. If you’d like, you may title your box.
1. Worst Copy (Rough Draft)
You are invited to write as though your character is writing this.
Include the following information:
What is in the box?
Why/how was it selected?
What is the object’s significance? How does it relate to your character?
How does it relate to the time period?
2. Better Copy
When you are finished with your first copy, have someone at your table do the editing. After making editing changes, check to see if you can make any improvements on your statement. Don’t forget to use powerful words. Don’t forget to spell correctly.
3. Best Copy
After you have made all of the changes and your artist’s statement is a wonder to behold, email a final copy to me using Times New Roman font, size 14. Return all hard copies to me in the classroom folder.
Thanks,
Ms. Hillmer
Personal Identity in a Box
You can purchase identical boxes for your students to use. Sources can be found online. Boxes are available from Sax.
Children Beyond Borders - (Archive) VSA arts invited children with disabilities from around the world to creatively reconfigure identical 4" square boxes for display during the 2002 Cultural Olympiad held in Salt Lake City. The result, 'Children Beyond Borders', is a collection of original boxes from over 52 countries that expresses these young artist's ideas, dreams, and visions. Inspired by the success of 'Women Beyond Borders', located at http://www.womenbeyondborders.org/
See work listed by artist or by location (Archive)
For a clever display - hang boxes from a tree that is supported in a bucket of plaster or concrete. See installation ideas (Archive)

Lesson: "All Boxed In" - Identity Boxes
Being familiar with various approaches to self portraits, students then explored symbolism in art. Students created personal assemblages about themselves selecting objects, images and papers to be representative both symbolically and literally. When completed, artists working in a similar fashion were shown.
Afterwards, a reflection
sheet ![]() was completed by the student artist. (Archive)
was completed by the student artist. (Archive)
More Examples and details on Linda's Word document. 

Lesson: Self Esteem Through Self Portraits and 6-Trait Poetry Writing
They were done by fifth graders, with acrylics on canvas and sponge painting in the background. It was part of a "Self Esteem Through Self Portraits and 6-Trait Poetry Writing" grant that I received. Here is what we did:
1. Colored blank puzzles with words and pictures expressing each student
2. Painted self portraits
3. Wrote various poetry about themselves
4. Collaged the poetry in hand bound accordion/concertina style books
5. Displayed the end results at our school's Fine Arts Night. Books shown below:


 Submitted by: Jan Hillmer
Unit: Frida Kahlo - "The Frame" - Painting
Lesson: Self Portrait - Retablo
Grade level: Second grade on up.
Jan had enough donated trophy backgrounds (clear Plexiglas with some holographic 'rays') to use behind the self portraits if she made them small and oval shaped (approx 3" x 5"). Ovals were cut from cardboard and covered with foil (If using heavy duty foil - some tooling may be done with dull pencil) They painted a small self portrait on them suing tempera paint mixed with a touch of soap. Jan found that the tempera still flaked off and suggests trying Acrylic Paint. This might be a good lesson to try mixing a touch of gloss medium with your paint (even tempera - check to make sure compatible) The students attached the self portrait to the front of the trophy background. Jan discussed "The Frame" (available in many different size prints - in many prices ranges) and connecting it to the retablo style art of Mexico as my art history connection. Links page to come.
Adaptation: Try tooling foil backed by cardboard. Repousse frame around the portrait.
Look
and Learn: Self-Portraiture with Pets Inspired by Frida Kahlo
Lesson by Alexandra Benton (on NY Learns)
Students will use a WebQuest to learn about the Mexican artist Frida Kahlo's life and her self-portraits. Artists will develop and create a self-portrait, which includes an animal with a meaningful background.
Books
Frida Kahlo: The Artist who Painted Herself
Frida Kahlo
Frida Kahlo Self Portrait
 Submitted by: Jan Hillmer
Unit: Pop Art - Portraits - Painting -Drawing
Lesson: Lichtenstein style self portraits
Grade level: Third on up
This project can be done all in tempera (making dots with small dowels)- or tempera and marker combined - or all in markers. It reinforces the primary colors while teaching the students a little about the art of Roy Lichtenstein and the Pop Art movement (Roy Lichtenstein (American Pop Artist, 1923-1997).
Students draw self portrait from observation. Hand held mirrors provided. Show emotion. Divide the negative space in an interesting way. Plan portions of the portrait to be in the Benday dot technique - some in line -and other parts solid. Color or paint areas - focus on contrast, balance, unity.
Lichtenstein Posters
M-Maybe by Roy Lichtenstein 24x32 poster
Ohhh...Alright... by Roy Lichtenstein, 14x11


 Submitted by: Mary Jane Hadley
Lesson: "Museums of I: All About Me"
Peter Max: Statue of Liberty
Grade level: 4th grade
The Statue of Liberty project was based on the art of Peter Max. They drew a portrait of the Statue of Liberty on Xerox paper then I ran them off on transparencies. They went over the drawings on transparencies with a black Sharpie. Then they did an abstract painting to go behind the transparency. Finally they created a patriotic frame with stripes and stars. (Note: Students could even draw directly on end pieces of laminating film that have been saved - lay their pencil drawing under it. FREE Plexiglas could be used for older students)
Alternate: Students could draw a self portrait - or a portrait of a family member.
Peter Max Poster
Different Drummer by Peter Max

Book
The Art of Peter Max
 Submitted by: Jeryl Hollingsworth
Unit: Art/Technology - Portrait -Painting
Lesson: Face in the Mirror - Watercolor
Jeryl got this idea from Susan on Long Island (Getty TeacherArtExchange member) She did this unit for her exchange with a school in Japan. The project brings to mind the "slice of life" woodblock prints from the Edo period. Take digital photos of the students prior to this project (make a uniform size). It may be helpful to provide a template for the mirror (just to get size right).
Jeryl used Sharpies and watercolors but any drawing material may be substituted. Glue digital photo in mirror. Try Crayon for a Grandma Layton influence. See Grandma looking in mirror.
Susan on Long Island is "famous" on Getty TeacherArtExchange for her creative ideas. This is from one of her posts.
Part I: "The current lesson my 2nd grade is doing involves a self-portrait and a hand mirror. Although it has a different twist, you might be able to use it. The kids did self portraits of the BACK of their heads, neck and shoulders. Next they created a hand mirror (designed from paper), with shiny silver paper in middle. At this point, you can have them draw their self portrait and glue onto hand mirror. I, however, took a picture of each child's face with my digital camera, and glued it onto the paper mirror. Now each child created an arm and hand holding the mirror. Glue that next to the head so it looks like they are holding and looking into the mirror.
Part II of lesson: I showed them how to draw the inside of a room in simple perspective. They did their bedrooms and used Van Gogh's Bedroom at Arles as an inspiration. They glued their self portraits, hand holding mirror and all, to this bedroom drawing then painted (in water colors) background. They are really cool looking. Sounds complicated for 2nd grade, but it really wasn't, and everyone was successful.
~ Susan on Long Island
From Judy: You might try simplifying - by having students draw the portrait with outstretched hand holding mirror on quality drawing paper. Then draw the bedroom around it - this will cut down on the amount of cutting and gluing. Now I know why this reminded me of the Edo period prints. Van Gogh was greatly inspired by Japanese prints and this came across in his paintings of interiors.
Another Jeryl Lesson: Digital Self Portrait Transparency Overlay
(this works with Special Need students, too)
Materials:
Digital Camera


(or heavy drawing paper - could
be cut to 8 ½ x 11 (21.5 x 28 cm), Watercolor Paint


Introduce the Art of Peter Max and Andy Warhol.
Introduce some non-objective - expressionistic art (pick some favorites). Show some different styles of painting.
Students play - literally - with paints on 8 ½ by 11 (21.6 x 28 cm) paper (or 9 x 12 / 22.9 x 30.5 cm)... Teach some experimental watercolor techniques- anything goes... paint with any body part that can hold a brush (hands - feet - mouth - strapped to the head - whatever works. There will be no such thing as a bad painting. Just be careful you don't end up with "mud". You might want to have them limit to related colors for each painting . Do cool a colors painting - do a warm colors painting. Select colors that have special meaning to them - show emotions. They could do several different ones (on 9 x 12 / 22.9 x 30.5 cm size paper). What kind of emotions are you expressing? (Note student could work larger with painting - then select a portion of it for the portrait overlay).
Take digital photograph portraits during class - one at a time. Try to have a strong light on one side for dramatic portraits... have them show the emotions they were expressing in their paintings. (You might even take a couple different photos of each student prior to this unit - have them make a couple different expressions - then let them select the photo/emotion for their digital portrait).
Have student select photograph and favorite painting. Manipulate photograph to high contrast black and white (how to's are on IAD lesson plan for cut paper portrait). It would be nice if students could see how this is done. When I taught multi-handicapped, they liked going to the computer lab.
Print photographs on transparencies (right on printer) - OR make transparency on photocopier - both ways will work (you can probably get the photocopier transparencies from your school office supplies).
Overlay the transparency photo over the painting. Blacken photograph with permanent marker if it didn't come out dark enough (I have never done this personally so do not know what works best)
Students make a border frame with cut paper (optional) or simply a construction paper mat (cut opening slightly smaller than 8 ½ x 11)- OR mat finished work with a quality Mat board. Optional: Make collage a border of words around the photograph on the mat. Choose words expressing who they are.

Note: Older - more capable students could work larger and make their own transparency using Acetate and permanent markers - lay enlarged photo under the Acetate and trace - then fill in. You could go as large as 12" x 18" (30.5 x 46 cm) for those. For elementary, I would keep them 8 ½ x 11 (21.5 x 28 cm).
 Lesson: About Me PowerPoint
Submitted by: Kathleen Arola
The students (2nd - 6th grade) took digital photos of themselves on the first day of summer school. (They created word art documents with them.) Then during the last couple of days of summer school, I had everyone create Power Point presentations about their favorite things. Students had the option of inserting their photo from the first day.
Here's the exciting part that I want to share - I took digital photos of students as they shared their presentations. The most interesting pictures were those of the students (taken in the dark, without a flash) standing in front of their huge picture of themselves on the screen.
"About Me" by Travis Hall. Email was sent September 2004 asking permission to use this image. No reply was received. I will remove image if requested. Art teacher for this project was Dianne Crumbacker. Travis was in her Life Skills class. Travis won the state level for VSA.
 Submitted by: Marcia Lavery
Lincoln Junior High, Skokie, Illinois
Names - Lesson Ideas (page another name lesson)
Lesson: Pattern Name Designs
The 6th grade Name Design drawings are a fun, first lesson of the year. Marcia showed the students how to write their name in bubble or block letters and then they fill in their names with any kind of patterns (This student chose to use animal patterns). The students then create a background for their drawing, but must have their name show the most EMPHASIS (by making it the biggest, placing it in the center, etc.). Patterns could tell something about the students' personality.
From Maggie White: I did a name design lesson similar to Marcia's that came out super! The students had to make the letters touch the sides of the page, so a lot of negative/positive spaces were created. They filled in the negative spaces with different patterns, and left the letters blank. Cool and unexpected reversal. The students were really into it. It was especially interesting, with all-girl and all-boy classes, to compare the boys' aesthetic sense with the girls. From Denise Pannell: Second graders create abstract name designs. Marker drawing using the letters in their names to form a design and colored with marker.
Alternate Idea - Self Portrait Idea using Mirrors
NOTE: This idea was inspired by Linda Kieling's student self portrait practice drawings drawn right onto mirrors with overhead markers.
Name Rubric - Patterns
Submitted by: Kathleen Arola
Name ____________________________________________ Date __________
Rubric For Animal Skin Names
|
Exceeds |
Meets |
Progressing |
Unsatisfactory |
||||||||||||||||||||||||||||||||||||||||||||||||||||||||||||||||||||||||||||||||||||||||||||||||||||||||||||||||||||||||||||||||||||||||||||||||||||||||||||||||||||||||||||||||||||||||||||||||||||||||||||||||||||||||||||||||||||||||||||||||||||||||||||||||||||||||||||||||||||||||||||||||||||||||||||||||||||||||||||||||||||||||||||||||||||||||||||||||||||||||||||||||||||||||||||||||||||||||||||||||||||||||||||||||||||||||||||||||||||||||||||||||||||||||||||||||||||||||||||||||||||||||||||||||||||||||||||||||||||||||||||||||||||||||||||||||||||||||||||||||||||||||||||||||||||||||||||||||||||||||||||||||||||||||||||||||||||||||||||||||||||||||||||||||||||||||||||||||||||||||||||||||||||||||||||||||||||||||||||||||||||||||||||||||||||||||||||||||||||||||||||||||||||||||||||||||||||||||||||||||||||||||||||||||||||||||||||||||||||||||||||||||||||||||||||||||||||||||||||||||||||||||||||||||||||||||||||||||||||||||||||||||||||||||||||||||||||||||||||||||||||||||||||||||||||||||||||||||||
Shows that name is focal point |
|
|
|
|
||||||||||||||||||||||||||||||||||||||||||||||||||||||||||||||||||||||||||||||||||||||||||||||||||||||||||||||||||||||||||||||||||||||||||||||||||||||||||||||||||||||||||||||||||||||||||||||||||||||||||||||||||||||||||||||||||||||||||||||||||||||||||||||||||||||||||||||||||||||||||||||||||||||||||||||||||||||||||||||||||||||||||||||||||||||||||||||||||||||||||||||||||||||||||||||||||||||||||||||||||||||||||||||||||||||||||||||||||||||||||||||||||||||||||||||||||||||||||||||||||||||||||||||||||||||||||||||||||||||||||||||||||||||||||||||||||||||||||||||||||||||||||||||||||||||||||||||||||||||||||||||||||||||||||||||||||||||||||||||||||||||||||||||||||||||||||||||||||||||||||||||||||||||||||||||||||||||||||||||||||||||||||||||||||||||||||||||||||||||||||||||||||||||||||||||||||||||||||||||||||||||||||||||||||||||||||||||||||||||||||||||||||||||||||||||||||||||||||||||||||||||||||||||||||||||||||||||||||||||||||||||||||||||||||||||||||||||||||||||||||||||||||||||||||||||||||||||||||
Uses a different animal skin pattern for each letter |
|
|
|
|
||||||||||||||||||||||||||||||||||||||||||||||||||||||||||||||||||||||||||||||||||||||||||||||||||||||||||||||||||||||||||||||||||||||||||||||||||||||||||||||||||||||||||||||||||||||||||||||||||||||||||||||||||||||||||||||||||||||||||||||||||||||||||||||||||||||||||||||||||||||||||||||||||||||||||||||||||||||||||||||||||||||||||||||||||||||||||||||||||||||||||||||||||||||||||||||||||||||||||||||||||||||||||||||||||||||||||||||||||||||||||||||||||||||||||||||||||||||||||||||||||||||||||||||||||||||||||||||||||||||||||||||||||||||||||||||||||||||||||||||||||||||||||||||||||||||||||||||||||||||||||||||||||||||||||||||||||||||||||||||||||||||||||||||||||||||||||||||||||||||||||||||||||||||||||||||||||||||||||||||||||||||||||||||||||||||||||||||||||||||||||||||||||||||||||||||||||||||||||||||||||||||||||||||||||||||||||||||||||||||||||||||||||||||||||||||||||||||||||||||||||||||||||||||||||||||||||||||||||||||||||||||||||||||||||||||||||||||||||||||||||||||||||||||||||||||||||||||||||
Bases animal skin patterns on real animals |
|
|
|
|
||||||||||||||||||||||||||||||||||||||||||||||||||||||||||||||||||||||||||||||||||||||||||||||||||||||||||||||||||||||||||||||||||||||||||||||||||||||||||||||||||||||||||||||||||||||||||||||||||||||||||||||||||||||||||||||||||||||||||||||||||||||||||||||||||||||||||||||||||||||||||||||||||||||||||||||||||||||||||||||||||||||||||||||||||||||||||||||||||||||||||||||||||||||||||||||||||||||||||||||||||||||||||||||||||||||||||||||||||||||||||||||||||||||||||||||||||||||||||||||||||||||||||||||||||||||||||||||||||||||||||||||||||||||||||||||||||||||||||||||||||||||||||||||||||||||||||||||||||||||||||||||||||||||||||||||||||||||||||||||||||||||||||||||||||||||||||||||||||||||||||||||||||||||||||||||||||||||||||||||||||||||||||||||||||||||||||||||||||||||||||||||||||||||||||||||||||||||||||||||||||||||||||||||||||||||||||||||||||||||||||||||||||||||||||||||||||||||||||||||||||||||||||||||||||||||||||||||||||||||||||||||||||||||||||||||||||||||||||||||||||||||||||||||||||||||||||||||||||
Draws at least two animal parts extending beyond letters |
|
|
|
|
||||||||||||||||||||||||||||||||||||||||||||||||||||||||||||||||||||||||||||||||||||||||||||||||||||||||||||||||||||||||||||||||||||||||||||||||||||||||||||||||||||||||||||||||||||||||||||||||||||||||||||||||||||||||||||||||||||||||||||||||||||||||||||||||||||||||||||||||||||||||||||||||||||||||||||||||||||||||||||||||||||||||||||||||||||||||||||||||||||||||||||||||||||||||||||||||||||||||||||||||||||||||||||||||||||||||||||||||||||||||||||||||||||||||||||||||||||||||||||||||||||||||||||||||||||||||||||||||||||||||||||||||||||||||||||||||||||||||||||||||||||||||||||||||||||||||||||||||||||||||||||||||||||||||||||||||||||||||||||||||||||||||||||||||||||||||||||||||||||||||||||||||||||||||||||||||||||||||||||||||||||||||||||||||||||||||||||||||||||||||||||||||||||||||||||||||||||||||||||||||||||||||||||||||||||||||||||||||||||||||||||||||||||||||||||||||||||||||||||||||||||||||||||||||||||||||||||||||||||||||||||||||||||||||||||||||||||||||||||||||||||||||||||||||||||||||||||||||||
Designs background to compliment name |
|
|
|
|
||||||||||||||||||||||||||||||||||||||||||||||||||||||||||||||||||||||||||||||||||||||||||||||||||||||||||||||||||||||||||||||||||||||||||||||||||||||||||||||||||||||||||||||||||||||||||||||||||||||||||||||||||||||||||||||||||||||||||||||||||||||||||||||||||||||||||||||||||||||||||||||||||||||||||||||||||||||||||||||||||||||||||||||||||||||||||||||||||||||||||||||||||||||||||||||||||||||||||||||||||||||||||||||||||||||||||||||||||||||||||||||||||||||||||||||||||||||||||||||||||||||||||||||||||||||||||||||||||||||||||||||||||||||||||||||||||||||||||||||||||||||||||||||||||||||||||||||||||||||||||||||||||||||||||||||||||||||||||||||||||||||||||||||||||||||||||||||||||||||||||||||||||||||||||||||||||||||||||||||||||||||||||||||||||||||||||||||||||||||||||||||||||||||||||||||||||||||||||||||||||||||||||||||||||||||||||||||||||||||||||||||||||||||||||||||||||||||||||||||||||||||||||||||||||||||||||||||||||||||||||||||||||||||||||||||||||||||||||||||||||||||||||||||||||||||||||||||||||
Demonstrates neatness |
|
|
|
|
||||||||||||||||||||||||||||||||||||||||||||||||||||||||||||||||||||||||||||||||||||||||||||||||||||||||||||||||||||||||||||||||||||||||||||||||||||||||||||||||||||||||||||||||||||||||||||||||||||||||||||||||||||||||||||||||||||||||||||||||||||||||||||||||||||||||||||||||||||||||||||||||||||||||||||||||||||||||||||||||||||||||||||||||||||||||||||||||||||||||||||||||||||||||||||||||||||||||||||||||||||||||||||||||||||||||||||||||||||||||||||||||||||||||||||||||||||||||||||||||||||||||||||||||||||||||||||||||||||||||||||||||||||||||||||||||||||||||||||||||||||||||||||||||||||||||||||||||||||||||||||||||||||||||||||||||||||||||||||||||||||||||||||||||||||||||||||||||||||||||||||||||||||||||||||||||||||||||||||||||||||||||||||||||||||||||||||||||||||||||||||||||||||||||||||||||||||||||||||||||||||||||||||||||||||||||||||||||||||||||||||||||||||||||||||||||||||||||||||||||||||||||||||||||||||||||||||||||||||||||||||||||||||||||||||||||||||||||||||||||||||||||||||||||||||||||||||||||||
Additional Teacher Comments
Additional Student Comment
|
Submitted by: Mary Jane Hadley Lesson: Self Portrait Ceramic Plates
The clay plates identified them with their classmates. First they all made a clay stamp of the bottom of their shoe. These were fired in the Kiln. Their portrait was drawn on a styrofoam plate. You know the procedure. This plate was transfered to the center of the plate by rolling on top of it with a printing roller. The "fossil" stamps of their footprints were shared amongst their classmates to decorate the frame. I rolled newspaper and made a coil that was about taped together into an oval. The clay slab was laid in the center to dry in a bowl shape. |

 Submitted by: Mary Jane Hadley
Lesson: Bobble Head Self Portrait Dolls
Grade level: 4th grade
The dolls were "bobble head dolls"! They were their self-portraits. We used 2 Huggie drink bottles. We needed 400 bottles for this project! The body was a bottle. The head was a bottle which I cut about an inch from the top. Both were paper mached with paper towels and Ross paper mache paste. Before paper mached the body, we wrapped the top lip with a doubled (for strength) twisted Pipe Cleaners


 Submitted by: Jeryl Hollingsworth
Lesson: What is in Your Head? Who am I Collage?
From Jeryl: I got the idea from the NAEA conference - presentation "The Magic of Self-Portraiture" by Lauren Parmelee Murphy. Lauren did a whole group of self portrait ideas. One was to do silhouettes of the students and let them fill in their head with a magazine collage of what is going in their brain.
I traced their heads on black paper (using overhead Projector
Another idea which I'm going to use next year with my 3rd graders earlier in the year is to let them draw gears and machines inside their head because our 3rd grade does simple machines in science in the fall.
 Submitted by: Cynthia Gaub, Virtual
Classroom (Archive - See her new site here)
Submitted by: Cynthia Gaub, Virtual
Classroom (Archive - See her new site here)
Lesson: Collage Personality Hand:
Draw a picture of your own hand, by tracing or contour drawing.
Pick out pictures from magazines or your own photos that show YOUR personality.
FILL the entire SHEET with images around your hand, ALL white space must be filled.
Lesson adaptable elementary through middle school. Click on the image for full size.
Miscellaneous Portrait Lessons
|
Submitted by: Linda Woods
Proportion was discussed for each features, as well as head size, shoulder width, arm and hand length. A few kids aren't "there" yet, but I was really pleased that most of them really seemed to enjoy learning about proportion. |

|
Submitted by: Tammy Willis Where have you come from , Where are you going? Lesson: What's in your head? |

Submitted by: Judy Decker
Lesson: Self Portraits over time - for K-5 Art Teachers
Preparation:
Collect a number of self portraits from various artists (Rembrandt,


Materials:
9 x 12 (23 x 30.5 cm) Drawing Paper


This idea was sparked by a Getty TeacherArtExchange post made by Susan of Long Island. Self portraits would be drawn each year starting in Kindergarten or first grade. These could be done at the start of the year to use as a skill assessment - or at the end of the year to show growth. Each year, students carefully draw their portraits on 9 x 12 paper to the best of their ability (with little instruction from the teacher - a portrait unit could be done later in the year going more in depth). Use your choice of drawing materials. Portraits are kept in a portfolio for each student and given back at the end of fifth grade. Reflection on the portraits would occur during fifth grade when the PowerPoint with portraits over time would be shown and discussed with students. At the end of fifth grade, students write about the changes that have occurred and their feelings. Mount the portraits and student writing for display at graduation - give to parents. This is a real parent pleaser.
Here is Susan's "Progressive Portraits" - and idea she borrowed from a co-worker:
At the end of each school year every student gets a mirror and supplies to draw/paint a self-portrait on 9x12 paper, that they sign and date. Sometimes they will draw their interests in the background. I keep a manila file for all the kids, by grade level, with their name on the file. For 460 kids, it only takes up one file drawer. Anyway, at the end of elementary school, each student has 6 self-portraits which we mount together, accordion-style, and display at graduation. The kids don't get to see all of them until the end of 5th grade. They reflect on their growth, what the portraits make them remember, and they write a reflection that is included with the portraits. If the reflection is too personal to share, I let the students put it in a sealed envelope, attach it the the portraits, with a message "Open when I'm 18". We talk about how growing up changes our perspective - very therapeutic! The display and the process has become the highlight of 5th grade graduation, and it certainly puts the spotlight on ART!
Animal Morph Portraits - from Marybeth Bortzfield
I have a lesson my 5th graders really liked; A self-portrait that was one half human and then morphed into the animal that best illustrates their personality. On the back they needed to list 3 adjectives that explained their personality and how that animal represented it best. As they worked I moved around and talked with the students individually and I learned a whole lot about them and how they felt about themselves.
Submitted by: Larry Seiler
Lesson: Wire Self Portraits
Materials: A spool of simple stovepipe Twisteez Wire

Procedure:
Using mirrors, students draw continuous line simple drawing of their face, head and hair shape, neck and collar on 12"x 18" (30.5 x 46 cm) paper, then measure out in inches length of the line and cut the wire. Tape the drawing down and students bend the wire to conform to the drawing.
American Masters series Alexander Calder
Simple... but at the same time has a great presence in exhibition...
Other projects Mary Jane did on this theme.
4th: Fauve self-portraits (tempera blocks)- Matisse self-portraits (cut paper), Sketchbooks

3rd: Picasso self portraits
Things that make me go EEEE! based on Munch The Scream (I can't find this painting. If anyone knows what this is, please contact me so I can put a link to it. I don't mean the one by Edvard Munch- I mean the one based on that one.)
Landscape paintings based on color field paintings of Peter Max (I can't find any field paintings by Peter Max. If you know of any, let me know so I can put a link to it)
2nd: Pictures based on Tar Beach II by Faith Ringgold;
Clay picture frames with their picture in it.
Additional Lesson Plans
Personal Symbols - Identity Portrait - by Theresa Parker
An IAD lesson- Students discuss the meaning of identity, explore traditional, cultural, and invented symbols, study portraits which use visual symbols, create a portrait which includes symbols to express their identity, and write a short artist's statement describing their work.
Who
am I?: Self Portraits in Art and Writing [Archive]
This is an excellent lesson from the National Gallery of Art. Description: "Students will look carefully at self-portraits in the National Gallery of Art's collection by Vincent van Gogh, Paul Gauguin, Judith Leyster, David Alfaro Siqueiros, and Andy Warhol and respond to questions online. They will also make a variety of self-portraits and write poetry, a speech, and a letter about themselves—all to be placed in their self-portrait portfolio.


Submitted by: Lotte Petricone
Lesson: Scratchboard self portrait from digital photograph
Dramatic lighting was used to create striking photographs of the students. Using Adobe Photoshop, high contrast images were created. Students explored a variety of textures interpreting the image on Scratchboard
Submitted by: Julie Sawyer
Lesson: Portraits with Stenciled Backgrounds
Here is a project everyone loved. Going outside and using spray paint, stencil letters, cut up strawberry containers and other textures, kids create a textured background for a portrait they will draw (on good drawing paper) with colored pencils and add this portrait on top of the background with 3D O's creating a shadow. I think this idea came from a combination of lessons from Getty list.
We take old mat board or watercolor paper if I can spare it, several different colors of spray paint, usually silver, gold, black and red are favorites. We go outside, lay down newspaper with rocks so they don't blow away and arrange stencil letters, textures (pebbles, shells, the plastic baskets that fruit comes in, skateboard wheels, torn paper, etc. etc.) and spray through these. Some of my students are really into graffiti, so this is a "hook" right away -- other kids have never used spray paint and they are into trying something new. Everyone loves being outside in September -- so it works for just about every kid.
Lots of kids take off their fancy sneakers or Tims or wear plastic bags over them -- I didn't realize this was an issue until I came to this school when I warn them that the wind might carry the spray paint a little and to have lots of room between them (only 5 kids outside at a time -- my room has an outside door, luckily).
Once they have a background, graffiti-type wall, they have to draw a person (head and shoulders so that there are no floating "balloon" heads) with colored pencil using shading and lots of practice with skin tone blending. They can draw from observation of a friend, a photo or a magazine photo. Most kids use magazines and draw someone they like (sports or music person usually).
These came out great last year, looked really contemporary, and hung up at the Board of Ed for a month or so.
Those of you wanting a safer alternative to spray paint can try watercolor in spray mist bottles - or toothbrush spatter with stencils stencils, letters etc.
Submitted by: Denise Pannell
Lesson: The Scream- Emotions
Denise developed a lesson plan based on Edvard Munch


Submitted by: Cathy Rode
Lesson: Mixed Media Acetate Portraits
Begin by placing a piece of Acetate on top of a mirror. Students trace their face (different expressions) onto the Acetate with a fine point marker. When finished, they paint a simplified version of their portraits with Acrylic Paint on the opposite side of the Acetate. They must have an idea of form, light, and shadow. The next step is to find patterned backgrounds from wrapping paper, origami, or colorful magazine pages. They match the backgrounds to the portrait. They can even collage a background. The portraits are small (up to 8x 10) and are finished off by folding black cloth tape around the edges. I ask my students to make a series of these portraits and then to mat them on one board. Some students have difficulty tracing their faces from the mirror and can get frustrated so I tell them to create a loose interpretation and that puts them to ease.

 |
Submitted by: Shannon McGraw - Face Card Portrait Objective: 8th graders were to create face cards that incorporated a unique figure, while maintaining the look of a traditional face card. Card had to have a point of symmetry - to be able to be flipped seamlessly…They also had to demonstrate various scales of patterns. Motivation: Make connections to Renaissance art. Show elaborate royal costumes. Find examples of antique cards on line. Materials: Heavy drawing paper or poster board, pencils, permanent markers, rulers, temper paint or acrylic (Shannon used acrylic) - or markers could be used. (Click image for larger view) |
 |
Submitted by: Lotte Petricone - Contour drawing - digital collage The project began with a web quest exploring self-portraits. The artists then drew a pencil self-portrait from observation. The drawing was scanned into the computer and in Adobe Photoshop combined with images that describe the artist's life. Note: when using trademarked/copyrighted images, students could write letters for permission. Permission will be granted as they can not limit rights of expression. They can limit the right to display the work publicly. Most trademark forms do ask to see an example of the finished work. Teach a mini lesson in trademark and copyright law. |
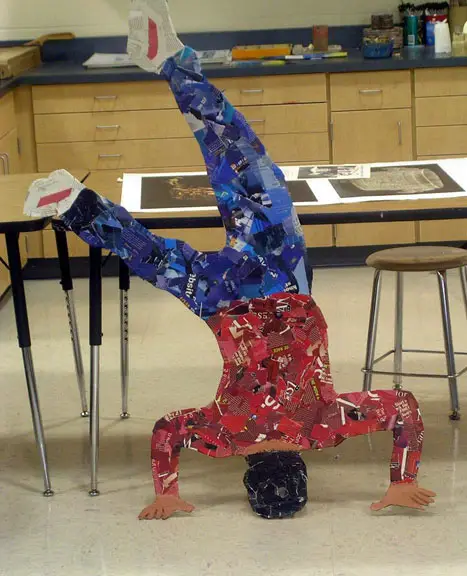 |
Submitted by: Mark Anderson Mark teaches at Oak Park High School in Missouri. This project began with digital photographs of students. Each group selected the photo they wished to enlarge onto corrugated cardboard. These are life size cut-outs. The figures were filled in with colored papers from a variety of sources (magazines, painted papers, newspapers - etc) - including text. Some student groups chose to paint the facial features while others chose to collage them Romare Bearden style (see close up detail) |
High School Portrait Lessons
|
Cut Paper Self Portrait
More lessons from Marvin Bartel |
From Marvin's Getty TeacherArtExchange post (8/19/2004): |

Have you considered using the grid on mirrors? This works for self portraits if you hold one eye closed or use eye patches. Using mirrors may help them gain observation drawing confidence and skill. Mirrors can be marked off with strings or markers. - Marvin Bartel
This is another variation.
http://www.bartelart.com/arted/cutpaperself.htm#easier
 |
Submitted by: Ken Schwab This was a project I did with a portrait unit. We used color schemes and had a fun time. The students created the outline contours and then used geometric lines, shapes and circles to get the design format. Using the original areas of light and dark they created a pattern of colors that work through the composition. By keeping the areas of dark and light the same, they can still be seen as the portrait, or they can get more abstracted. Student used tempera paint. Acrylics could also be used. |
|
Submitted by: Julie Sawyer Julie had her students strike a pose that expressed something about themselves - an "attitude." Digital photographs were taken. The photographs were used to make these near life size acrylic paintings on Stretched Canvas. Lesson was a huge success.
This lesson could be adapted to middle school using corrugated cardboard as "canvas". |
 
|
 |
Submitted by: Grace Hall
Digital photographs were taken of students. The students posterized them - or use cut paper filter in Adobe Photoshop. They experimented with various color combinations in Adobe Photoshop before working on paintings.
Student drew portrait on large watercolor paper then painting with watercolors - using bold colors for highlights and shadows. Warm/cool color contrast was important. |
Submitted by: Patty Knott
UNIT: Identity - Self - Portrait
1. Play some "get to know you games" not only teacher get to know student, but peer to peer, and student to self
2. Do some observational portraits from mirrors use lousy paper make it non-threatening assess their skills determine what needs to taught proportion, etc. give them several opportunities to make the best they can but keep from judging don't expect perfection
3. Take their best efforts and photo copy 5 times - Direct them to make 5 manipulations on the photo copy then make 5 more copies- then 5 more- then 5 more
20 manipulations give them the freedom to do whatever but try to distinguish the difference between manipulation and decoration (some will decorate 20 times instead of manipulate 20 times)
4. When they have 20 manipulations ( my best manipulation this year was a student who took her drawing and put chocolate, pepperoni, and mustard on her photo copy and put it in the microwave) have them display all the drawings in a grid --- Do a critique what works what has potential pull the best 3
5. Find objects of personal interest, find famous art works that appeal, draw the objects determine what is in the famous works that appeals - make connections
6. From the 3 best manipulations --- manipulate some more
7. Take bits and pieces from the manipulations, from the objects, from the famous works and create a composition that expresses "self"
Allow for student choice ... the media, the format, the size, 2-D, 3-D, relief... if it's a self portrait, those things should be student choice. Right now I have 20 kids doing 20 different things from Adobe Photoshop to paintings to pencil drawings. My favorite so far is a student who reduced his face to a "follow the numbers/ line drawing" (remember those?) and combined it with some very 50's looking kinds of advertising images and is developing a triptych. All his choices are very 50's -- he doesn't understand the intuitive choices but is loving the freedom to choose. I also have another favorite that is so Baroque... I always find this exercise as a great way to really know what my kids relate to and then be able to direct their work to their strengths and interests. Choice is a lot of work for me. but gets the best results from the kids. When I tap into what they respond to, it ultimately makes my job easier.
I have long ago let go of any lessons that requires all to respond in the same fashion. Today, I had a a kid who just wasn't able to keep up and make the choices. He was fiddling. "What art do you like?" I asked. Much to my surprise he said, Japanese. "You mean that cartoon stuff?" I said. " No, he said, the traditional stuff." So I pulled a book from my shelves on woodblock prints and his eyes opened wide and I saw yes yes and within a half an hour he had his plan and it's a WOW plan.
Anyone who recognizes my name knows that I am an advocate for student generated ideas in art. I believe that the art teacher's best function is as a facilitator of evoking and evolving what comes from the student's head. We must use what we know to nurture what they will develop. The future of art is not in repeating endlessly what has been done, but in awakening the possibilities of where it can go. I see so many new and exciting ways that observations can be made and I see art ed sticking with, unwilling to give up, 500 year old traditions...... The Renaissance was an incredible period of enlightenment but I want to see a new Renaissance. I want to use where we have been quickly and get on to where we are going.
Where are we going?
There are no easy art lessons... don't ever forget what it is that made you choose art and give your kids the struggle it's the struggle that will give them the satisfaction. One of my favorite things to show in class is a clip from "Sunday in the Park with George"
Art is all about disrupting the formulas not following them find the ways to let them do what they think they want to do then find the ways to make what they want to do follow the conventions that we think they should be but also wonder about about how they bring new formulas that maybe we don't get. Always think about what observation really means and you will make new generations that observe.
Submitted by: Patty Knott and Edna Patterson-Petty
Lesson: Fill your head with positive thoughts
This was a lesson about building self esteem for young teenage mothers. It can be done with any age. Each person was given a Styrofoam (wig) Head.
Submitted by: Maggie White
Lesson: Expressive Self Portraits
I've used Bunki Kramers gridded self portraits with my high school students, using Cray-Pas or Nupastels (Bunki teaches at Los Cerros Middle School). They were outstanding. I have also combined the same idea with Ken Schwab's Cubism lesson.
Submitted by: Judy Decker
Lesson: Personal Shrine - Identity Box
A good end of year project would be a "Personal Shrine"/Identity box/shadow box. You can make the boxes from corrugated cardboard (or find a source for cigar boxes). Cut a facade for box - and doors. Tape box together. Tape surface of cardboard with wide masking tape (this help prevent warping). Tape front and back side of doors to make hinge (devise an interesting closure for box). Apply one layer of paper mache - then paint or collage. Students could write about themselves - print off copies - and collage that around box. Students could make "treasures" from the air dry clay to glue inside. See Peruvian Retablos for inspiration.
If you don't want to make boxes - each student could bring in some kind of container to use (like an old lunch box - tin - etc). These could be covered with a layer of paper mache and collaged or painted.
- Students make - or bring in - small objects that tell something about themselves to put inside the box/container.
- Write a reflection about the project.
- How to make a self-portrait
There are many different ways to make a self-portrait – it doesn't have to be a traditional drawing or painting of your face.
What will your self-portrait say about you?
Making a self-portrait is a great way to express and explore your identity. It's not about what your parents, friends, teachers, brothers or sisters think you should be. It's about who you think you are.
Ideas to get you started
Think of the things that make you what you are:
the clothes you wear and the way you look
the music you listen to and the music you make
the words you write and the images you create
what you've been through and how you feel now
where you live and where you belong
the things you love and the things you hate
your passions, politics and beliefs
your family and friends
the things that make you laugh and the things that make you cry
the places you like and the places you fear
the people you admire and the people you trust
the messages you write and the messages you receive
You might think that your bedroom, your clothes, your diary or even some of your favorite objects, photographs or documents say more about you than any mirror image could describe.
In your self-portrait you need to be the real you.
Above information copied from Self Portrait UK 14-19
See Student Gallery Self Portrait UK 14-19 Who Art You? (Archive) From Channel 4 - 4 Learning
